LED控制
内容纲要
绚丽多彩的灯光很吸引人,那么接下来,使用LED。
元器件:
所有用到的元器件,这里不在列出,主要LED、阴极管、阻尼器、主板、按钮、电线
这里使用的通用型LED,分别是R、G、B、Y、O LED,GPIO接口:
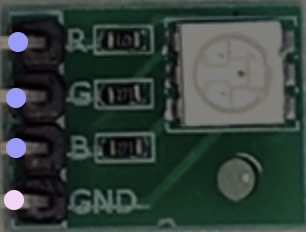
输入是:

由于LED长时间没有用,首先测试一下:
const Io: unknow = require('yourself deivce');
const board: Io.Board = new Io.Board();

board.on('ready', (): void => {
  const led1: unknow = new Io.Led(2);
  const led2: unknow = new Io.Led(3);

  board.repl.inject({
    led1: led1,
    led2: led2
  });
});
然后开启LED:
>> led1.on()
>> led2.brightness(128)
如果报错,请尝试REPL。
定义闪烁规则
当LED可以闪烁后,改变一下闪烁规则,AnimateLed类:
const options: Object = {
  easing    : 'inOutSine',
  metronomic: true,
  loop      : true,
  keyFrames : [0, 255],
  duration  : 1000
};
const pulsingLED: any = new Io.Led(3);
const options: any    = { /* 闪烁了。。 */ };
const animation: any  = new Io.Animation(pulsingLED);//不同主板闪烁规则请参考相关文档
animation.enqueue(options);

//pulsingLED.pulse(1000); 规律闪烁
或者这样设置:
board.on('ready', (): void => {
  const pulsingLED: any = new Io.Led(3);
  const timerLength: number = 10000;
  let t: number = setTimeout((): void => {
    pulsingLED.pulse();
  }, timerLength);
});
也可以与光敏电阻结合:
const Io: unknow = require('yourself deivce');
const board: Io.Board = new Io.Board();

board.on('ready', (): void => {
  const nightlight: any = new Io.Led(3);
  const ldr: any = new Io.Light({ pin : 'A0', freq: 500 });
  let dimmest: number = 1024;
  let brightest: number = 0;
  ldr.on('change', (): void => {
    if (ldr.value < dimmest)   { dimmest   = ldr.value; }
    if (ldr.value > brightest) { brightest = ldr.value; }

    const relativeValue: any = Io.Fn.scale(ldr.value, dimmest, brightest, 0, 511);
    if (relativeValue <= 255) {
      nightlight.brightness((relativeValue >> 1) ^ 255);
    } else {
      nightlight.off();
    }
  });
});
彩色LED
这里接入天气API来演示(有很多可以免费使用次数的天气API,可以去百度的API市场。或者自己抓接口,但不建议):
const API_KEY: string = '这里是你API的KEY,一般是要KEY的';
const LAT: string = '43.3463760';
const LONG: string = '-72.6395340';
const API_URL: string  = 'https://api.xxx.xx/xxx';//用自己找的,有很多

const Io: unknow = require('yourself deivce');
const board: Io.Board = new Io.Board();

const DEFAULT_TIMER: number = 60000;
const UPPER_LIMIT: number = 99 * 60000;
const LOWER_LIMIT: number = 1000;

board.on('ready', (): void => {
  console.log('wahahahaha');
  const rgb: any = new Io.Led.RGB({ pins: [3, 5, 6] });
  const requestURL: string = `${API_URL}/${API_KEY}/${LAT},${LONG}`;

  request(requestURL, function (error: any, response: any, body: any) {
    if (error) {
      console.error(error);
    } else if (response.statusCode === 200) {
        const forecast: Object= JSON.parse(body);
        const daily: any= forecast.daily.data;
        const willBeDamp: any = daily[1].precipProbability > 0.2;
        const tempDelta: any  = daily[1].temperatureMax - daily[0].temperatureMax;
        console.log(forecast);

        if (tempDelta > 4) {
          rgb.color('#ff0000');
        } else if (tempDelta < -4) {
          rgb.color('#ffffff');
        } else {
          rgb.color('#00ff00');
        }
        if (willBeDamp) { rgb.strobe(1000); }
    }
  });
});
LED显示屏
LED可以显示基本的字符和形状,当然,非字符的形状也可以显示,能显示多少取决与点阵数,一般演示162或者57就可以了。
编写Advanced类:
const Io: unknow = require('yourself deivce');
const board: Io.Board = new Io.Board();

board.on('ready', (): void => {
  const downButton: any = new Io.Button(2);
  const upButton: any = new Io.Button(3);
  const goButton: any = new Io.Button(4);
  const lcd: any = new Io.LCD([7, 8, 9, 10, 11, 12]);
  //lcd.cursor(0, 0).print('hello, world');
  //lcd.cursor(1, 0).print('hello, indeex');

  const alertLED: any = new Io.Led(6);
  let remaining: any, timer: any, timeString: string, lastTimeString: string, timestamp: nunber, lastTimestamp: number;

  downButton.on('press', () => {
    console.log('down');
  });
  upButton.on('press', () => {
    console.log('up');
  });
  goButton.on('press', () => {
    console.log('go');
  });
});
然后是时间的计算和按钮处理,单独编写一个类:
private remaining: any = DEFAULT_TIMER;
private lastTimeString: string = '00:00';
private timeString: string= '';

private init (): void {
    showRemaining(remaining, lastTimeString, timeString);
}

private showRemaining (remaining: any, lastTimeString: any, timeString: any): void {
    let minutes: any, seconds: any, minPad: any, secPad: any;
    minutes = Math.floor(remaining / 60000);
    seconds = Math.floor((remaining % 60000) / 1000);
    minPad = (minutes < 10) ? '0' : '';
    secPad = (seconds < 10) ? '0' : '';
    timeString = `${minPad}${minutes}:${secPad}${seconds}`;
    if (timeString !== lastTimeString) {
      lcd.cursor(0, 0).print(timeString);
    }
}

private adjustTime (delta: any): void {
    remaining += delta;
    if (remaining < LOWER_LIMIT) {
      remaining = LOWER_LIMIT;
    } else if (remaining > UPPER_LIMIT) {
      remaining = UPPER_LIMIT;
    }
    showRemaining(remaining, lastTimeString, timeString);
}

private start (): void {
    lcd.clear();
    timestamp = Date.now();
    timer = setInterval(tick, 250);
    tick();
  }

  private pause (): void {
    timer = clearInterval(timer);
    lcd.cursor(0, 9).print('PAUSED');
  }

  private tick (): void {
    lastTimestamp = timestamp;
    timestamp = Date.now();
    remaining -= (timestamp - lastTimestamp);
    if (remaining <= 0) {
      timer = clearInterval(timer);
      //chime();
      init();
    }
    showRemaining(remaining, lastTimeString, timeString);
  }

downButton.on('press', (): void => {
    adjustTime(-1000);
});
upButton.on('press', (): void => {
    adjustTime(1000);
});

goButton.on('press', (): void => {
    if (!timer) {
      start();
    } else {
      pause();
    }
})

init();
添加声音
接着在tick函数里添加声音:
private chime () {
    alertChime.play({
    tempo: 120,
    song: [
      ['e5', 1],
      ['g#5', 1],
      ['f#5', 1],
      ['b4', 2],
      ['e5', 1],
      ['f#5', 1],
      ['g#5', 1],
      ['e5', 2],
      ['g#5', 1],
      ['e5', 1],
      ['f#5', 1],
      ['b4', 2],
      ['b4', 1],
      ['f#5', 1],
      ['g#5', 1],
      ['e5', 2]
    ]
  });
  lcd.cursor(0, 9).print('DUANG!');
}
当然不会发出DUANG的声音,只会发出有频率的电压声。
code enjoy!
作者:indeex
著作权归作者所有。商业转载请联系作者获得授权,非商业转载请注明出处。